Kubernetes Services enable communication between various components within and outside of the application.
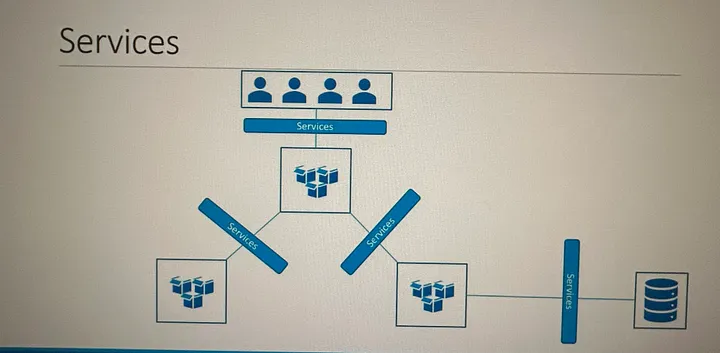
Kubernetes Services helps us connect applications together with other applications or users.
Kubernetes Services are a vital component for enabling communication between different parts of an application running in a Kubernetes cluster. They provide a consistent, discoverable endpoint to access a set of pods, even as those pods may come and go due to scaling, updates, or failures.
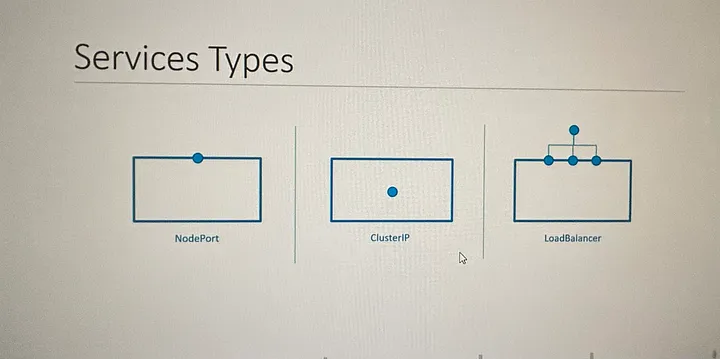
Here are the main types of Kubernetes Services:
1. ClusterIP:
— This is the default type of service. It provides a stable internal IP address that is reachable only within the cluster.
2. NodePort:
— This service type opens a specific port on all nodes and routes traffic to the service.
— It’s accessible externally (outside of the cluster) using the node’s IP address and the chosen port.
3. LoadBalancer:
— This type creates an external load balancer in a supported cloud provider (like AWS, GCP, Azure, etc.) and assigns it a public IP address.
— It automatically balances traffic across all pods of the service.
4. ExternalName:
— This type allows you to map a service to a DNS name, effectively providing a way to expose services from one namespace to another.
5. Headless:
— This is a service without a cluster-internal IP. It’s used for service discovery by other services or for direct access to the pods.
6. Service with Selector:
— This is a common service type. It exposes a set of pods defined by a label selector.
7. Endpoints:
— Not a service type per se, but it’s a Kubernetes resource that’s automatically created by a service. It holds the addresses of actual pods targeted by a service.
Here’s an example of creating a simple ClusterIP service in Kubernetes using a YAML definition:
apiVersion: v1
kind: Service
metadata:
  name: my-service
spec:
  selector:
  app: my-app
  ports:
  - protocol: TCP
  port: 80
  targetPort: 9376
In this example, the service named `my-service` will direct traffic to pods with the label `app: my-app` on port `9376`. It will also expose itself internally on port `80`.
Remember to replace `app: my-app` with the labels that match the pods you want to expose.
Services play a critical role in ensuring that the various components of your application can communicate reliably, both within the cluster and potentially with external systems.
It is Services that enable connectivity between these groups of Pods. Services enable the frontend application to be made available to end users. It helps communication between backend and frontend Pods, and helps in establishing connectivity to an external data source. Thus Services enable loose coupling between microservices in our application.
Example scenario:
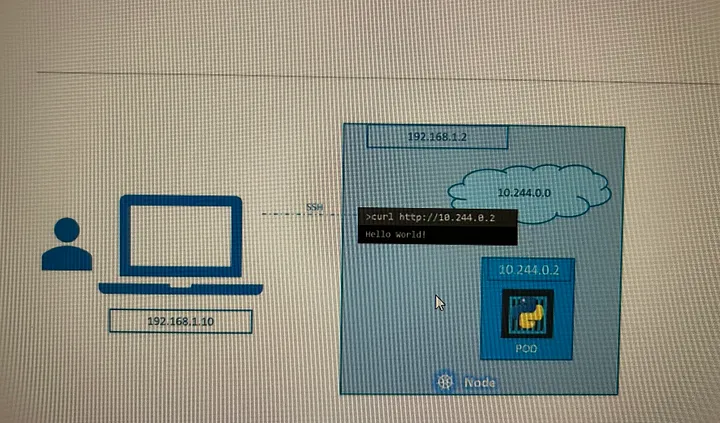
let’s look at the existing setup. The Kubernetes node has an IP addressand that is one 192.168.1.2. My laptop is on the same network as well, so it has an IP address, 192.168.1.10. The internal Pod network is in the range 10.244.0.0. And the Pod has an IP 10.244.0.2. Clearly I cannot ping or access the Pod at address 10.244.0.2 as it’s in a separate network. So what are the options to see the webpage?
First, if we were to SSH into the Kubernetes node at 192.168.1.2 from the node, we would be able to access the Pod’s webpage by doing a curl. But this is from inside the Kubernetes node and that’s not what I really want. I want to be able to access the web server from my own laptop without having to SSH into the node and simply by accessing the IP of the Kubernetes node.
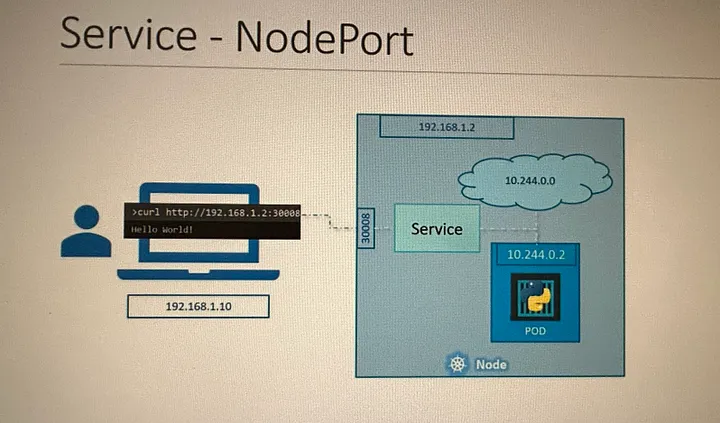
So, we need something in the middle to help us map requests to the node from our laptop, through the node, to the Pod running the web container. This is where the Kubernetes Service comes into play. The Kubernetes Service is an object, just like Pods, ReplicaSet, or Deployments that we worked with before. One of its use cases is to listen to a port on the node and forward request on that port to a port on the Pod running the web application. This type of service is known as a NodePort service because the service listens to a port on the node and forward request to the Pods.
Service — NodePort
Let’s take a closer look at the service.
If you look at it, there are three ports involved. The port on the Pod where the actual web server is running is 80, and it is referred to as the target port because that is where the service forwards their request to. The second port is the port on the service itself. It is simply referred to as the port. Remember, these terms are from the viewpoint of the service. The service is, in fact, like a virtual server inside the node. Inside the cluster it has its own IP address, and that IP address is called the ClusterIP of the service. And finally, we have the port on the node itself which we use to access the web server externally, and that is as the node port. As you can see, it is set to 30,008. That is because node ports can only be in a valid range which by default is from 30,000 to 32,767.
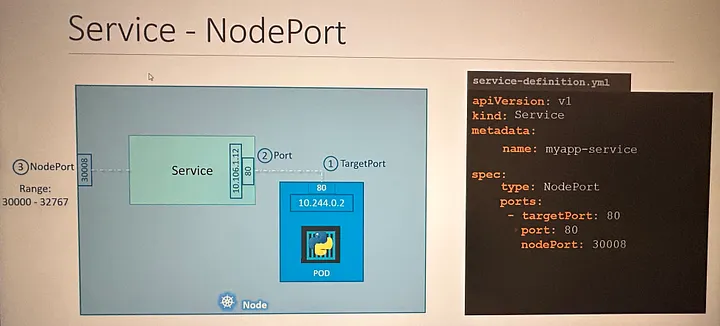
Note that ports is an array, so note the dash under the port section that indicate the first element in the array. You can have multiple such port mappings within a single service.
There is nothing here in the definition file that connects the service to the Pod. we will use labels and selectors to link these together.
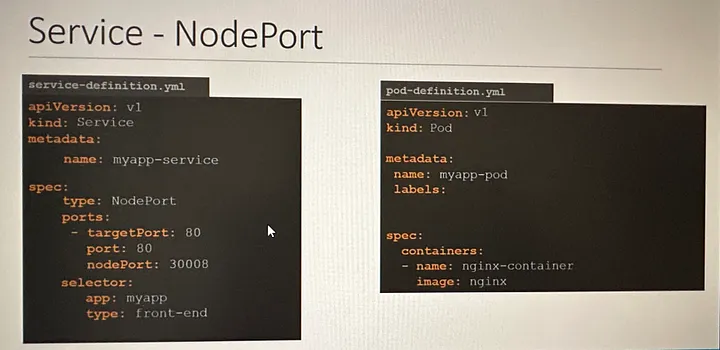
Pull the labels from the Pod definition file and place it under the selector section.
#kubectl create -f service-definition.yaml

#kubectl get services

#curl http://192.168.1.2:30008
In a production environment, you have multiple instances of your web application running for high availability and load balancing purposes. In this case, we have multiple similar Pods running our web application.
They all have the same labels with a key app and set to a value of my app. The same label is used as a selector during the creation of the service. So, when the service is created, it looks for a matching Pod with the label and finds three of them. The service then automatically selects all the three Pods as endpoints to forward the external request coming from the user.
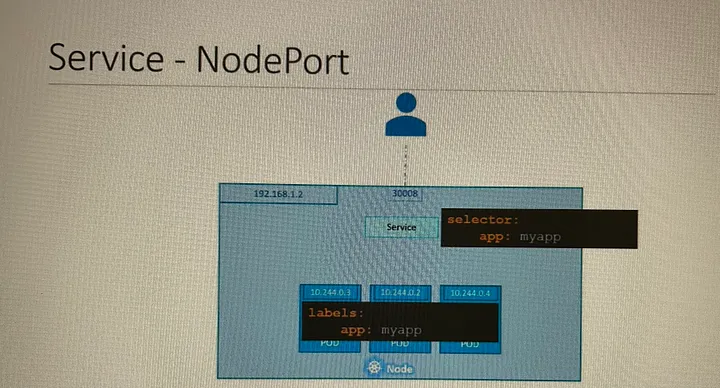
Algorithm: random
SessionAffinity: Yes
Thus, the service acts as a built-in load balancer to distribute load across different Pods.
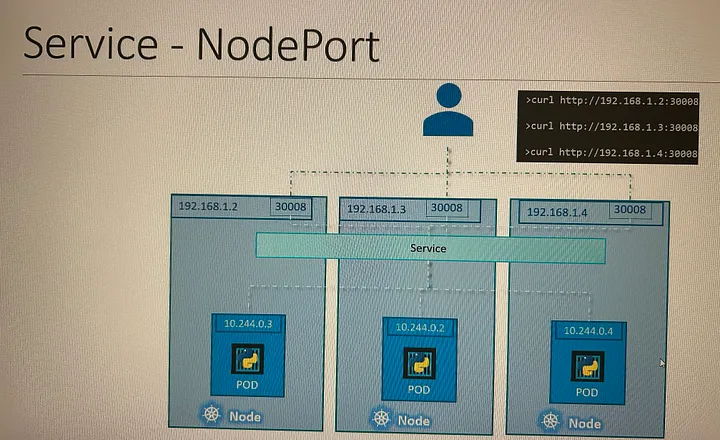
using the IP of any of these nodes, and I’m trying to curl to the same port, and the same port is made available on all the nodes part of the cluster.
To summarize, in any case, whether it be a single Pod on a single node, multiple Pods on a single node, or multiple Pods on multiple nodes, the service is created exactly the same without you having to do any additional steps during the service creation. When Pods are removed or added, the service is automatically updated, making it highly flexible and adaptive. Once created, you won’t typically have to make any additional configuration changes.
This is great
Thanks